
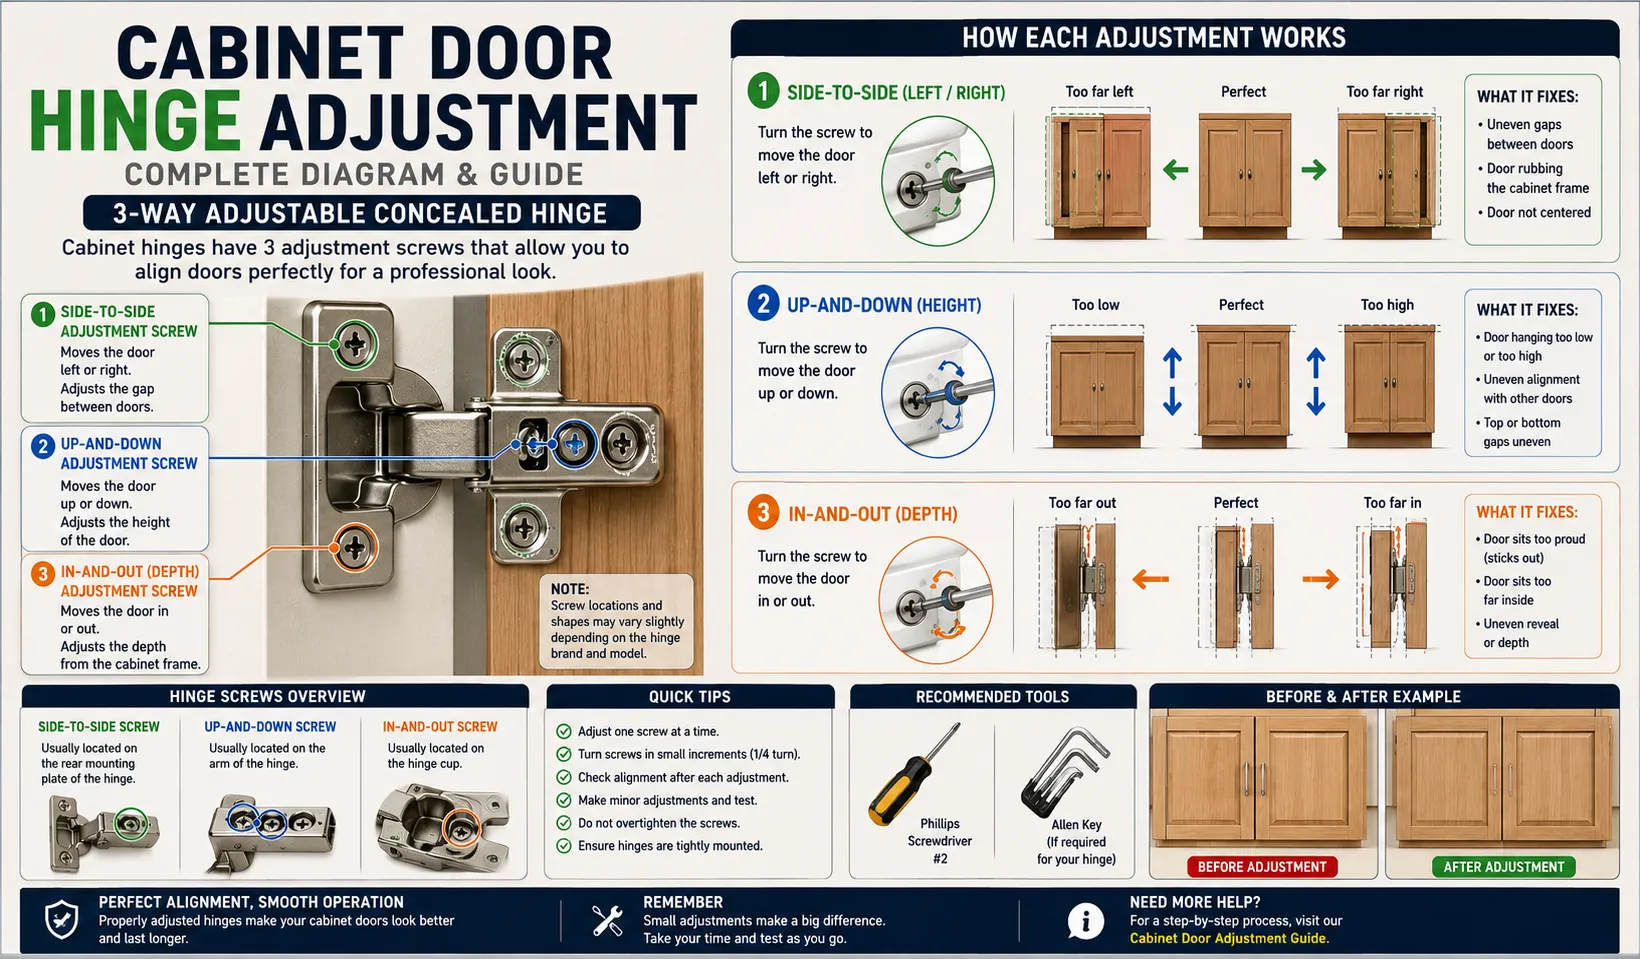
A cabinet door hinge adjustment diagram makes it much easier to understand which part of a concealed hinge controls the door’s position. If a cabinet door is crooked, rubbing against another door, sitting too high or low, or sticking out from the cabinet frame, the hinge may simply need adjustment rather than replacement.
Most modern concealed cabinet hinges provide several adjustment points. Depending on the hinge design, these can control side-to-side movement, height, and depth. The important thing is to identify what each screw or adjustment mechanism does before turning it.
In this guide, you’ll learn how to identify the common adjustment points, make small corrections, test the door, avoid common mistakes, and recognize when the hinge itself needs to be replaced.
What You Need ↓
Before adjusting a cabinet hinge, gather a few basic tools. A Phillips screwdriver is commonly needed for concealed cabinet hinges, although some hinges use Pozidriv, Torx, Allen, or another screw type. Using the correct bit helps prevent stripped screw heads. A measuring tape or small ruler can help you compare uneven gaps, while a small level is useful when checking whether the door is sitting evenly. A flashlight can also help when the hinge is inside a dark cabinet.
For difficult-to-reach hinges, an optional cabinet hinge adjustment tool can make the job easier. You generally do not need specialized equipment for a normal adjustment.
Before You Start ↓
Before touching any adjustment screw, close the cabinet door and look carefully at how it sits in the opening.
Check the gap along the top, bottom, and sides. Compare the door with neighboring cabinet doors if you have a row of cabinets. Look for obvious problems such as:
- The door is too far left or right.
- The top of the door is higher or lower than another door.
- The door rubs against the frame.
- The door sticks out farther than the surrounding doors.
- The door sits too deeply inside the cabinet.
- The hinge or mounting plate appears loose.
Open the door and inspect the hinge itself. Modern concealed hinges commonly have multiple screws, but their positions and functions vary between manufacturers and hinge models. Do not assume that every screw works in exactly the same way.
If the hinge mounting screws are loose, tighten them carefully before attempting fine alignment. An adjustment screw cannot properly correct a hinge that is moving because its mounting hardware is loose.
If you’re working with a modern concealed hinge and want a broader walkthrough, this guide on how to adjust cabinet door hinges can be useful alongside the diagram.
Step 1 ↓ Identify the Hinge Adjustment Screws
The first step is understanding the three common directions of cabinet door adjustment.
1. Side-to-Side Adjustment
The side-to-side adjustment moves the door horizontally, allowing you to correct the gap between neighboring doors or between the door and cabinet frame.
This adjustment is useful when:
- Two cabinet doors have uneven gaps.
- One door sits too close to another.
- The door rubs against the side of the cabinet.
- The door needs to move slightly left or right.
On many concealed hinges, a screw on the hinge arm controls this movement. However, the exact screw location depends on the hinge design.
2. Up-and-Down Adjustment
The height adjustment changes the vertical position of the cabinet door. It can help when:
- One door sits higher than another.
- The top gaps are uneven.
- The bottom of the door is too close to the cabinet.
- Two doors do not line up horizontally.
Some hinges allow vertical adjustment through the mounting plate, while others use a different adjustment mechanism. Always inspect the hinge before deciding which screw controls height.
3. In-and-Out Adjustment
The depth adjustment controls how far the door sits inside or outside the cabinet frame.
It is particularly useful when:
- The door sticks out from the cabinet.
- The door sits too far inside.
- The front surface does not look flush with neighboring doors.
- The door has an uneven reveal around the frame.
This is often called depth adjustment or in-and-out adjustment.
Step 2 ↓ Adjust the Side-to-Side Position
Start with the easiest problem to identify: an uneven horizontal gap.
Close the cabinet door and look at the space between it and the neighboring door or cabinet frame. If the gap becomes wider at one end, the door may need a small side-to-side correction.
Locate the hinge’s lateral adjustment mechanism. On many concealed hinges, this is a screw on the hinge arm rather than one of the screws holding the hinge to the cabinet.
Use the screwdriver to make a small adjustment—around one-quarter turn at a time. Do not immediately make a full rotation because a small screw movement can noticeably change the door position.
After the first adjustment:
- Close the cabinet door.
- Look at the gap again.
- Compare the top and bottom gaps.
- Open the door.
- Make another small adjustment if necessary.
Work on one hinge at a time when possible. If the cabinet has two hinges, the position of both hinges can affect the final alignment.
Simple Test
Close the door slowly and watch the side gap.
If the gap becomes more even after a small adjustment, you are working in the correct direction. If the gap becomes worse, return slightly and try the opposite adjustment according to your hinge design.
Step 3 ↓ Adjust the Door Height
If the door is too high, too low, or does not line up with the neighboring cabinet doors, check the height adjustment.
Some concealed hinge systems allow the hinge mounting plate to move vertically. Others have dedicated adjustment features. Loosen the appropriate mounting screws only as much as the hinge design requires, reposition the door carefully, and retighten them without over-tightening.
For hinges with a dedicated height adjustment mechanism, follow the hinge’s design rather than assuming a universal screw direction.
The goal is to make the top and bottom edges line up properly.
For example, if one cabinet door is noticeably lower than the door beside it, a small vertical correction may bring their upper edges into alignment. You may need to adjust more than one hinge to keep the door level.
Simple Test
Place a small level along the top edge of the door or visually compare it with the neighboring door.
Then open and close the door several times. Make sure the door does not shift after opening and closing.
If you are dealing with older hinges that do not resemble modern concealed hinges, see this guide to how to adjust old cabinet door hinges before changing the hardware.
Step 4 ↓ Adjust the In-and-Out Position
Once the door is positioned correctly from left to right and top to bottom, check its depth.
Stand a short distance away from the cabinet and look at the front surface. Does the door sit noticeably farther forward or farther back than neighboring doors?
If so, locate the hinge’s depth adjustment mechanism.
Make a small adjustment and close the door to check the result. Continue with small corrections until the door sits appropriately within the cabinet frame.
Do not force the screw if it becomes unusually difficult to turn. A damaged screw, incorrectly identified adjustment point, or hinge that has reached its adjustment limit may require a different solution.
Simple Test
Place your fingers lightly across the front edge of the adjusted door and the neighboring door.
The surfaces should appear reasonably aligned rather than one door projecting noticeably farther forward.
Also check that the door can close without hitting the frame.
Testing ↓
After making the adjustments, perform a complete test rather than judging the door from one position.
1. Check the gaps
Look at the gap around the door. It should appear reasonably consistent from top to bottom.
2. Check neighboring doors
If the cabinet is part of a larger set, compare the adjusted door with the doors beside it.
3. Open and close the door
Operate the door several times. It should move smoothly without rubbing, scraping, or suddenly shifting.
4. Check the closed position
Make sure the door closes fully and sits correctly against the cabinet frame.
5. Recheck the hinge screws
After testing, make sure the hinge and mounting hardware remain secure.
If the door still looks slightly uneven, make another small adjustment rather than making a large change.
For a more comprehensive approach to correcting cabinet gaps and alignment, you can also follow this cabinet door adjustment guide.
Common Mistakes ↓
Turning the adjustment screw too far. Large adjustments can make the door alignment worse and make it difficult to understand what changed. Start with approximately a quarter turn and test.
Adjusting every screw at once
If you change height, side-to-side position, and depth simultaneously, it becomes difficult to determine which adjustment solved or caused the problem.
Adjust one direction at a time.
Ignoring loose mounting screws
A loose hinge can make the entire door move. Tighten loose mounting hardware before performing fine adjustments.
Assuming every hinge is identical
Different manufacturers use different mechanisms. A screw that controls depth on one hinge may not perform the same function on another.
Over-tightening
Over-tightening can damage the screw head, hinge, mounting plate, or cabinet material. Tighten firmly but avoid excessive force.
Using the wrong screwdriver
A poorly fitting screwdriver can slip and damage the screw head. Choose a bit that fits the screw properly.
Trying to adjust a damaged hinge
Adjustment is not a substitute for a broken, bent, or badly worn hinge. If the hinge cannot hold its position, replacement may be necessary.
When to Replace the Part ↓
Adjustment is usually appropriate when the hinge is intact and the door simply needs alignment. However, replacement or repair makes more sense when the hardware itself is damaged.
Consider replacing the hinge when:
- The hinge arm is bent.
- The hinge cup is cracked or damaged.
- An adjustment screw is stripped.
- The hinge no longer holds its position.
- The hinge has excessive movement.
- The door repeatedly becomes misaligned.
- The hinge has reached its adjustment range.
- The cabinet mounting plate is badly damaged.
If the screws repeatedly pull out because the cabinet material around the mounting holes is damaged, simply installing another screw may not solve the problem. The mounting area may need repair first.
If the cabinet door itself is severely damaged or warped, replacing the door may make more sense than repeatedly adjusting the hinge. A replacement option such as a 3 piece premier adjustable cabinet door set may be worth considering when a complete door solution is actually needed.
The key is to diagnose the problem before buying replacement hardware.
Recommended Tools ↓
For most cabinet hinge adjustments, you can start with a few inexpensive tools:
- Phillips screwdriver: The most commonly useful tool for many concealed cabinet hinges.
- Screwdriver bit set: Helpful when different hinge screws require different profiles.
- Small level: Useful for checking the vertical and horizontal position.
- Measuring tape: Helps compare cabinet door gaps.
- Flashlight: Useful for inspecting hinges inside darker cabinets.
- Cabinet hinge adjustment tool: Optional for difficult or repetitive adjustments.
A basic Phillips screwdriver set on Amazon can be useful if you do not already have the correct screwdriver.
These Amazon links are optional recommendations. You should first check which screwdriver or bit matches your particular hinge.
FAQ ↓
Q: What is a cabinet door hinge adjustment diagram?
A: A cabinet door hinge adjustment diagram shows the common adjustment points on a hinge and explains how they affect door position, including side-to-side, height, and depth.
Q: Which screw moves a cabinet door left or right?
A: On many concealed hinges, a lateral adjustment screw on the hinge arm controls side-to-side movement. The exact location varies by hinge model.
Q: How do I adjust a cabinet door up and down?
A: Some hinges use a mounting-plate adjustment for height, while others have a dedicated mechanism. Make small changes and check the door after each adjustment.
Q: What does the depth adjustment screw do?
Depth adjustment moves the cabinet door inward or outward so it can sit properly against the cabinet frame.
Q: Why is my cabinet door still uneven after adjustment?
A: The hinge may be loose, damaged, incorrectly installed, or already at its adjustment limit. Check the mounting hardware before making additional adjustments.
Q: Can I adjust concealed cabinet hinges without removing the door?
A: Usually, yes. Many modern concealed hinges are designed to be adjusted while the door remains installed.
Final Takeaway
A cabinet door hinge adjustment diagram is most useful when you use it to identify the direction of movement before turning any screw. Start by checking the hinge and mounting hardware, then correct side-to-side position, height, and depth separately.
The safest approach is simple: make a small adjustment, close the door, inspect the gaps, and test the movement. If the hinge is damaged or the adjustment no longer produces a stable result, replacement or mounting-area repair may be a better solution than continuing to turn the screws.