
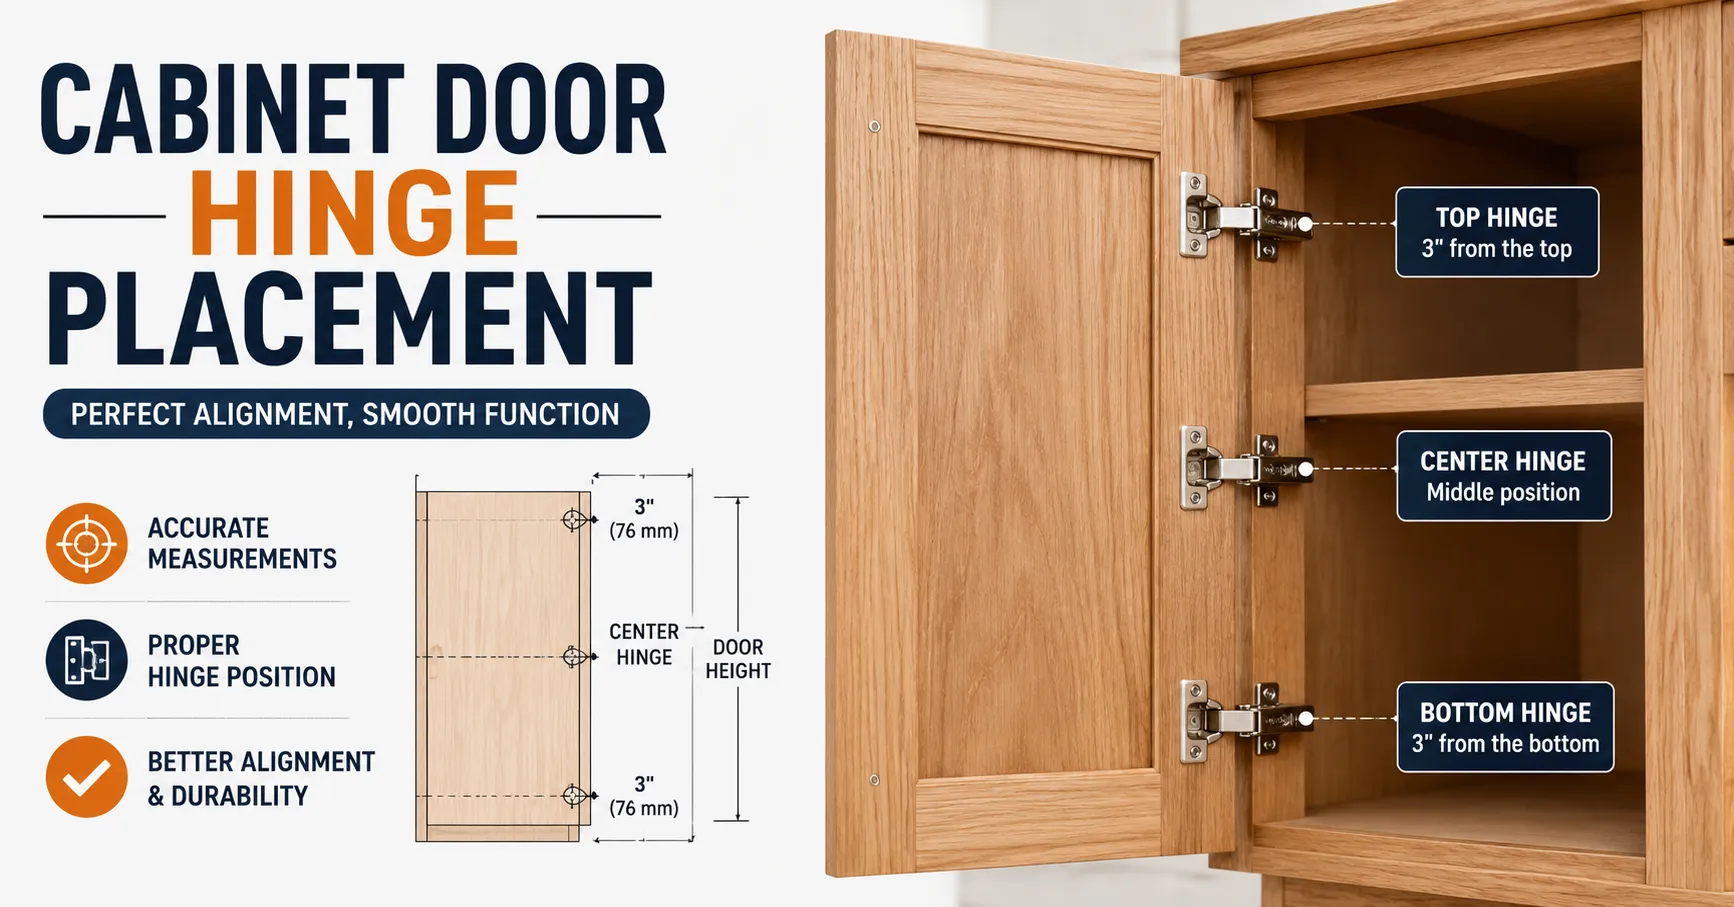
Choosing the right cabinet door hinge placement is essential for a door that opens smoothly, sits level, and maintains consistent gaps around the cabinet frame. Even a high-quality hinge can perform poorly when it is installed in the wrong position. Incorrect placement may cause the door to sag, rub against the cabinet, sit too high or low, or develop uneven reveals. The correct location depends on several factors, including the cabinet door’s height, weight, thickness, hinge style, overlay, and whether the cabinet uses a face frame or frameless construction. Before drilling any holes, it is important to identify the hinge type and follow its installation template or manufacturer’s specifications. This guide explains the most important placement considerations and provides practical ways to check and correct common hinge-positioning problems.
Quick Answer
For most cabinet doors, hinges are positioned toward the upper and lower portions of the door rather than directly at the corners. Taller or heavier doors may require additional hinges between the top and bottom hinges.
However, there is no single universal measurement for every cabinet door. The correct placement depends on the hinge design, door dimensions, door weight, cabinet construction, and whether the door is inset, partial overlay, or full overlay.
Before drilling:
- Measure the door accurately.
- Identify the hinge type.
- Determine the required overlay or inset.
- Check the hinge manufacturer’s drilling pattern.
- Mark both hinges carefully.
- Test-fit before permanently installing the hardware.
If your existing hinges are already installed but the door is uneven, you may need to focus on adjustment rather than completely changing the placement. Our guide on how to adjust a cabinet door hinge can help with that process.
Reason #1: Incorrect Vertical Placement Can Cause Sagging
One of the most common cabinet hinge placement problems is positioning the hinges too close together or too far away from the areas where they can properly support the door.
A cabinet door creates leverage against its hinges, especially when the door is tall, wide, or heavy. If the hinges are not positioned appropriately, the door may gradually sag after repeated opening and closing.
A sagging door can produce symptoms such as:
- Uneven gaps around the door
- The bottom corner touching the cabinet
- The top corner appearing too far away
- Difficulty closing the door
- A door that appears crooked
Heavier doors may also need additional hinges rather than simply moving two hinges.
Simple Test for Reason #1
Close the cabinet door and examine the gap between the door and cabinet frame.
Then gently lift the handle side of the door upward. If the door noticeably moves upward or the gap changes significantly, the hinges or their mounting points may not be providing sufficient support.
Also inspect the screws. Loose screws can create symptoms that look like incorrect hinge placement.
Reason #2: Horizontal Placement Affects Overlay and Door Gaps
Cabinet hinge placement is not only about vertical positioning. The horizontal position of the hinge cup or mounting hardware can affect how the door sits relative to the cabinet.
This is particularly important for concealed hinges.
The amount of cabinet door that extends over the cabinet frame is called the overlay. If you’re unfamiliar with the term, see our guide explaining what overlay means on a cabinet hinge.
Incorrect horizontal positioning can result in:
- Excessive overlay
- Insufficient overlay
- Uneven reveals
- Doors touching neighboring doors
- Door edges sitting too far inside or outside the cabinet
For this reason, you should never assume that the hinge position on one cabinet door can simply be copied onto another door.
Simple Test for Reason #2
Close the door and measure or visually compare the reveal around the cabinet.
If the top, bottom, and side gaps are inconsistent, check whether the hinge type and overlay requirements match the cabinet construction.
If the door has the correct hinge but the gaps remain uneven, adjustment may solve the problem without relocating the hinge.
Reason #3: The Wrong Hinge Type Can Make Correct Placement Impossible
Different cabinet doors require different hinge configurations.
Common types include:
- Concealed European-style hinges
- Face-frame hinges
- Inset hinges
- Overlay hinges
- Semi-concealed hinges
- Traditional surface-mounted hinges
- Invisible hinges
An inset cabinet door, for example, sits inside the cabinet opening. An overlay door sits partially or completely over the cabinet frame.
The hinge must match the door configuration.
For specialized installations, an invisible hinge such as a SOSS Model 204 invisible cabinet hinge may require a completely different installation approach from a standard concealed hinge.
Likewise, decorative hardware may be selected for appearance as well as function. For example, a champagne gold cabinet hinge can provide a different visual style from standard finishes.
Simple Test for Reason #3
Remove one hinge only if necessary and identify its model or configuration.
Check:
- Hinge type
- Door overlay
- Cup requirements
- Mounting pattern
- Door thickness requirements
- Cabinet-frame compatibility
If the hinge specifications do not match your door configuration, changing the hinge may be more effective than changing its location.
Reason #4: Measuring or Drilling Errors Can Shift the Door
Sometimes the hinge itself is correct and the planned placement is reasonable, but inaccurate measuring creates the problem.
A small drilling error can affect the way the hinge sits. If one hinge is positioned slightly differently from the other, the door may twist or sit unevenly.
Common measurement mistakes include:
- Measuring from different reference points
- Marking one hinge from the top and another from the bottom
- Forgetting door thickness
- Using the wrong hinge template
- Drilling before checking the overlay
- Allowing the drill to wander
- Installing screws at an angle
- Failing to support the door while marking
Simple Test for Reason #4
Measure from the same reference edge to both hinge locations.
For example, if you’re checking the upper and lower hinge positions, use a consistent reference method rather than measuring one location from the top and the other from the bottom.
Compare the actual hinge positions with the hinge manufacturer’s template.
If the two hinges do not follow the required pattern, incorrect measurement or drilling may be responsible.
Best Solution: How to Determine Cabinet Door Hinge Placement
The safest approach is to determine the hinge requirements before drilling.
Step 1: Identify the Cabinet Construction
First determine whether the cabinet is:
- Face-frame
- Frameless
A face-frame cabinet has a visible frame around the front of the cabinet box. A frameless cabinet generally has a more open front without a traditional face frame.
The mounting hardware and hinge configuration can differ between these constructions.
Step 2: Identify the Door Style
Determine whether the door is:
- Inset
- Partial overlay
- Full overlay
This is critical because the door’s relationship to the cabinet opening affects hinge selection and positioning.
Step 3: Identify the Hinge
Look at the existing hinge or the hinge you plan to install.
Check the manufacturer’s instructions for:
- Required drilling pattern
- Cup diameter
- Cup depth
- Mounting distance
- Overlay adjustment
- Door thickness
- Required screws
Never assume that two hinges that look similar have identical installation dimensions.
Step 4: Measure the Door
Record:
- Door height
- Door width
- Door thickness
- Approximate weight
- Cabinet opening dimensions
Tall or heavy doors may require additional hinges.
Step 5: Establish a Consistent Reference Point
Use a reliable reference edge when marking the hinge positions.
A measuring tape, combination square, marking gauge, or cabinet hinge jig can help maintain consistency.
Step 6: Mark the Hinge Locations
Mark the hinge positions according to the hinge manufacturer’s specifications.
Do not drill immediately.
Double-check both hinge positions and make sure the markings are aligned.
Step 7: Test-Fit the Hardware
If possible, test-fit the hinge before fully tightening all mounting screws.
This allows you to identify problems before creating permanent holes.
Step 8: Install and Adjust
Install the hinges and check:
- Vertical alignment
- Horizontal alignment
- Door gap
- Overlay
- Door height
- Opening and closing movement
Many modern concealed hinges provide adjustment screws that allow you to fine-tune the door after installation.
For a detailed adjustment process, see our guide on how to adjust cabinet door hinges.
If you’re working with older hardware, our guide on how to adjust old cabinet door hinges may be more relevant.
Important Measurements Before Drilling
Before installing cabinet hinges, check the following measurements.
Door Height
The overall height helps determine how many hinges may be appropriate and where they should be distributed.
Door Width
Wide doors can place additional leverage on hinges, making correct positioning particularly important.
Door Thickness
Hinge cups and mounting hardware may have specific requirements based on door thickness.
Overlay
Overlay determines how much of the cabinet frame is covered by the closed door.
Reveal
Reveal is the visible gap between the cabinet door and surrounding cabinet structure.
Hinge Cup Dimensions
Concealed hinges may require a specific cup diameter and depth. Always follow the hinge manufacturer’s specifications.
Hinge Spacing
Two hinges should not automatically be placed at arbitrary distances from the top and bottom. Use the hardware manufacturer’s recommended placement and account for the door’s size and weight.
Cabinet Door Hinge Placement by Door Type
Inset Cabinet Doors
An inset door sits inside the cabinet opening rather than covering the front of the cabinet frame.
Placement and hinge selection must account for the door sitting within the opening. Even a small measurement error can produce rubbing or inconsistent gaps.
Full-Overlay Cabinet Doors
A full-overlay door covers most or all of the cabinet frame around the opening.
The hinge must be compatible with the desired overlay. The mounting position and hinge adjustment range are particularly important.
Partial-Overlay Doors
Partial-overlay doors cover only part of the cabinet frame. The required hinge configuration depends on the amount of overlay.
Face-Frame Cabinets
Face-frame cabinets require hinges designed to work with the cabinet’s front frame. Some concealed hinges use specialized mounting plates for this purpose.
Frameless Cabinets
Frameless cabinets generally provide a different mounting surface for the hinge plate. Make sure the selected hinge system is designed for frameless installation.
Tall or Heavy Doors
Large cabinet doors may need more than two hinges.
Adding hinges can distribute the door’s weight more effectively, but the number and position should follow the hinge manufacturer’s recommendations.
Common Cabinet Hinge Placement Mistakes
Copying Another Cabinet
A nearby cabinet may use a different door thickness, overlay, or hinge model. Don’t copy its dimensions without verifying the hardware.
Measuring From the Wrong Edge
Always establish a consistent reference point before marking.
Ignoring Overlay
A hinge may be physically installed but still be wrong for the intended overlay.
Drilling Too Early
Mark twice and drill once. Test your measurements before making permanent holes.
Placing Hinges Too Close to an Edge
Extreme edge placement can weaken the mounting area or create interference with other cabinet components.
Using the Wrong Hinge
The wrong hinge can make alignment nearly impossible even if the physical placement seems correct.
Ignoring Damaged Mounting Areas
If the screw holes are stripped or the cabinet material is damaged, simply relocating the hinge may not solve the problem.
A cabinet hinge repair plate can sometimes reinforce a damaged mounting area and provide a stronger attachment point.
Assuming Adjustment Will Fix Everything
Adjustment can correct many alignment problems, but it cannot compensate for every incorrect installation or damaged cabinet component.
Recommended Tools & Hardware
For a cabinet hinge installation or repair project, several basic tools can make the work easier.
1. Cabinet Hinge Jig
A hinge jig helps maintain consistent drilling positions, especially when installing multiple cabinet doors.
2. Concealed Cabinet Hinges
If you’re replacing old concealed hinges, select a hinge that matches the door thickness, overlay, cabinet construction, and required cup specifications.
Amazon: Concealed Cabinet Hinges
3. Cabinet Hinge Drill Bit
A suitable drill bit can help create accurate hinge-cup holes when the hinge requires them.
Amazon: Cabinet Hinge Drill Bit
4. Cabinet Hinge Repair Plates
Repair plates can be useful when the original mounting area has stripped or damaged screw holes.
Amazon: Cabinet Hinge Repair Plates
5. Adjustable Cabinet Door Hardware
If you’re replacing multiple damaged components, an adjustable cabinet door set may simplify the repair.
See our guide to the 3-piece adjustable cabinet door set for additional information.
Disclosure: As an Amazon Associate, we may earn from qualifying purchases made through links on this page.
When Professional Repair or Replacement Makes Sense
DIY cabinet hinge installation is usually manageable when the cabinet material is in good condition and you have the correct hinge specifications.
Professional help makes more sense when:
- The cabinet material around the hinge is badly damaged.
- Screw holes are repeatedly stripping.
- The door is unusually heavy.
- Custom or expensive cabinetry is involved.
- The cabinet requires specialized invisible hinges.
- The door cannot be aligned after proper adjustment.
- Multiple hinge positions have already been drilled incorrectly.
- Structural damage exists around the cabinet frame.
For simple repairs, replacing or reinforcing the mounting area may be enough. For example, a repair plate can provide an alternative mounting surface when the original screw holes are no longer reliable.
For unusual applications, specialized hinge designs may also be appropriate. An invisible hinge system can be useful when the hardware needs to remain concealed.
FAQ
Where should cabinet door hinges be placed?
Hinges are generally positioned toward the upper and lower portions of a cabinet door, but the exact location depends on the hinge manufacturer’s specifications, door size, weight, and construction.
How far from the top and bottom should cabinet hinges be?
There is no universal distance that works for every hinge. Follow the manufacturer’s installation template and consider the door’s dimensions and weight.
Should cabinet hinges be evenly spaced?
For multiple hinges, spacing should distribute the door’s weight appropriately. The manufacturer’s recommended layout should take priority over simply making the hinges visually equal.
Does hinge placement change for inset doors?
Yes. Inset doors require the hinge to work within the cabinet opening, so hinge type, mounting position, and reveal requirements are different from many overlay installations.
Does overlay affect hinge placement?
Yes. Overlay determines how the door sits over the cabinet frame and must be considered when selecting and positioning the hinge.
Can I move a cabinet hinge?
Yes, but first determine why the existing position is incorrect. Moving a hinge without addressing the underlying problem can create additional holes and weaken the cabinet material.
Final Thought
Correct cabinet door hinge placement starts with identifying the door style, cabinet construction, and hinge type—not simply copying measurements from another cabinet. Measure carefully, follow the hinge manufacturer’s drilling pattern, verify overlay and door thickness, and test-fit the hardware before permanently drilling. For existing doors, check adjustment and mounting condition before relocating the hinges. With accurate measurements and the right hardware, most common cabinet-door alignment problems can be prevented before they start.