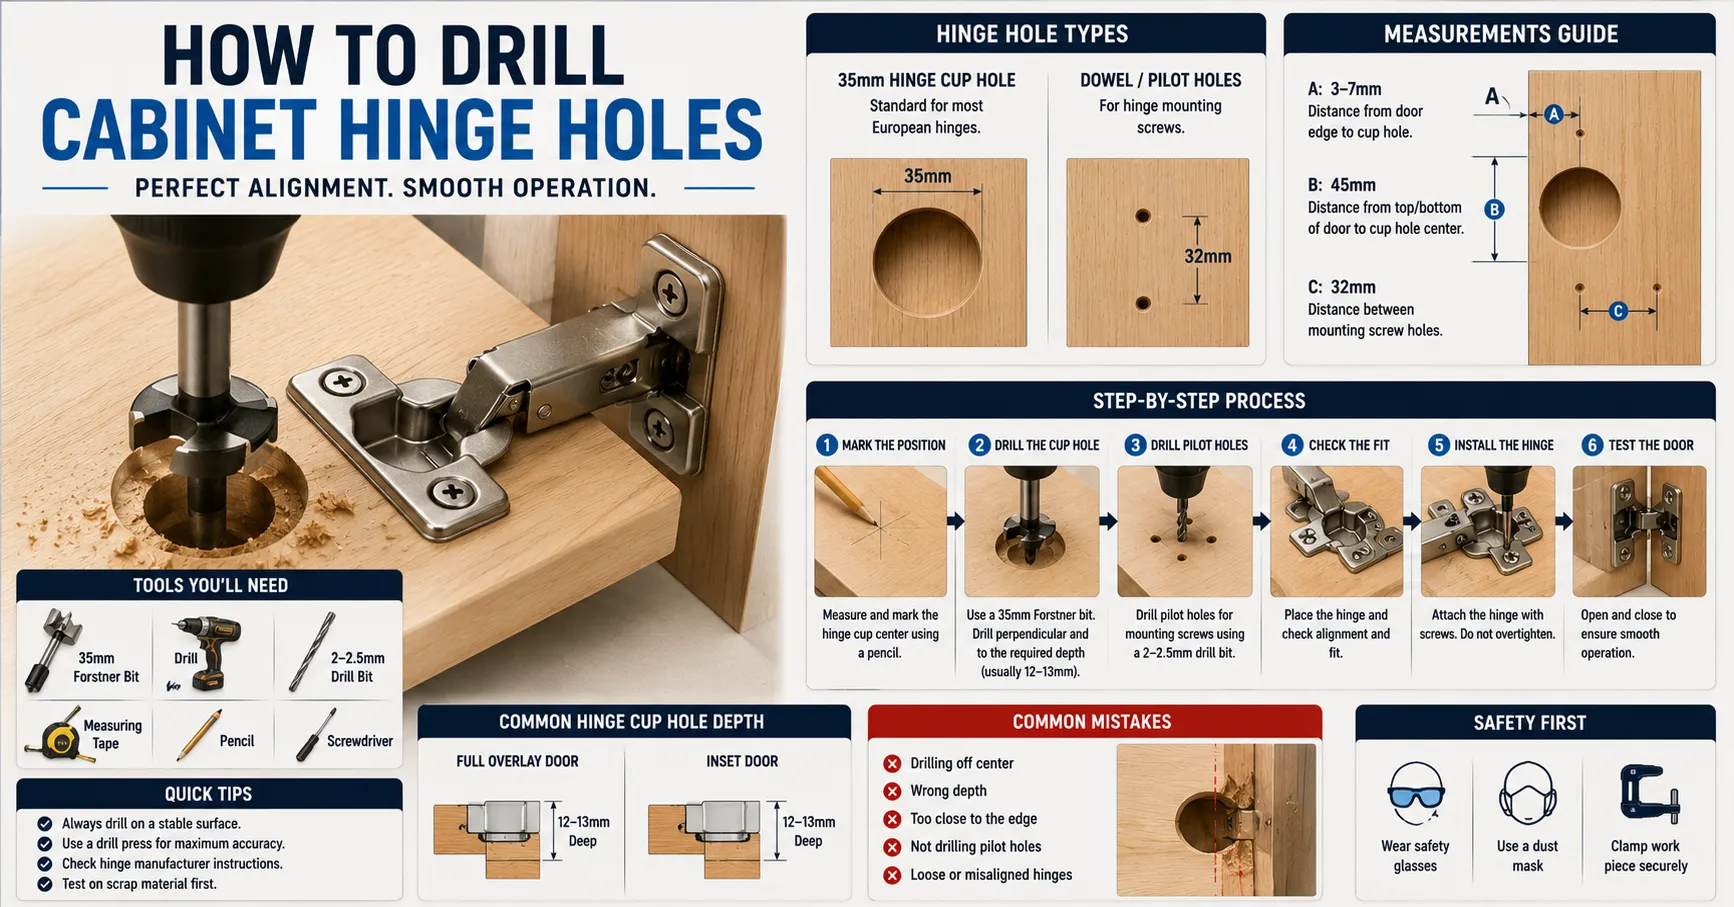
If you are installing concealed cabinet hinges, learning how to drill cabinet hinge holes accurately is essential. A hole that is slightly off-center, too deep, or positioned too close to the cabinet-door edge can cause alignment problems, weak mounting, or a door that will not close correctly. The good news is that drilling hinge holes does not require complicated equipment when you use the correct measurements and a suitable drilling method. Most concealed cabinet hinges use a circular hinge cup, commonly around 35 mm in diameter, but you should always verify the specifications of your particular hinge before drilling. This guide explains who needs to drill hinge holes, how to make a quick setup, what to check when it does not work, and when a damaged door requires replacement or professional repair.
Who Needs This?
This guide is useful if you are:
- Installing concealed cabinet hinges on a new door
- Replacing old hinges with a different concealed hinge
- Building a cabinet from scratch
- Moving hinge locations
- Repairing a cabinet door
- Installing European-style hinges
- Replacing a damaged hinge and needing new mounting holes
If you are replacing an existing hinge, do not start drilling immediately. First measure the existing hardware and compare it with the new hinge.
Our guide on how to measure a cabinet hinge can help you determine the important dimensions before making permanent holes.
Quick Fix
For a typical concealed cabinet hinge installation, the basic process is:
- Confirm the hinge’s required cup diameter and depth.
- Mark the hinge position on the cabinet door.
- Use a suitable drill bit or hinge-boring bit.
- Drill straight and control the depth.
- Test-fit the hinge cup.
- Install the hinge.
- Mount the cabinet-side plate.
- Adjust the door after installation.
Do not assume every concealed hinge uses exactly the same dimensions. Check the manufacturer’s specifications before drilling.
A 35 mm Forstner bit is commonly used for many concealed cabinet hinges that specify a 35 mm cup, but the correct bit size must match the hinge.
Did It Work?
After drilling, place the hinge cup into the hole without fully tightening the screws.
The cup should sit properly in the hole without excessive looseness.
Check:
- Is the hinge cup centered correctly?
- Is it sitting at the correct depth?
- Is the hinge flush with the door surface?
- Are the mounting holes correctly positioned?
- Does the hinge arm have enough clearance?
If everything looks correct, secure the hinge and continue with installation.
If the hinge does not fit correctly, do not enlarge the hole randomly. Continue with the checks below.
If YES → Done
If the hinge cup fits correctly and the door sits in the correct position, secure the hinge.
Install the cabinet-side mounting plate and attach the door.
Open and close the door several times.
You may need to make small adjustments to the hinge afterward.
For detailed adjustment instructions, see how to adjust cabinet door hinges.
If the final door position has uneven gaps, our cabinet door adjustment guide can help you diagnose the alignment problem.
If NO Check 2
Check the Hole Position and Measurements
If the hinge cup does not fit correctly, check the measurements before drilling again.
Important measurements include:
- Hinge cup diameter
- Cup depth
- Distance from the door edge
- Distance between hinge locations
- Door thickness
- Hinge mounting-hole position
- Required overlay
The distance between the edge of the door and the hinge cup is particularly important.
A hole that is too close to the edge can weaken the door or place the hinge in the wrong position. A hole that is too far from the edge can affect the overlay and door alignment.
If you need to understand overlay before marking the hole, see how to measure cabinet hinge overlay.
You can also learn what overlay means on a cabinet hinge before proceeding.
If Still NO Check 3
Check the Drill, Bit, and Depth
A poor-quality or incorrect drill bit can produce a hole with an uneven bottom or damaged edges.
For many concealed hinges, a Forstner bit is preferable because it can create a clean, flat-bottomed hole.
Check these factors:
Bit diameter: It must match the hinge manufacturer’s required cup size.
Depth: The hole should be deep enough for the hinge cup without breaking through the front of the door.
Drill alignment: Keep the drill perpendicular to the door surface.
Material: MDF, plywood, solid wood, and particleboard can behave differently during drilling.
A drill press can make consistent holes easier, but a drilling jig can also help maintain repeatable positioning when using a handheld drill.
Advanced Repair
If you accidentally drilled the hinge hole in the wrong position, do not simply continue drilling larger and larger holes.
The appropriate repair depends on the size and location of the mistake.
For a minor positioning error, you may be able to reposition the hinge if sufficient material remains around the correct location.
For a severely damaged hinge area, the door may need a repair insert, wood repair, or another reinforcement method.
If the cabinet-side mounting area rather than the door itself is damaged, a repair plate may be more appropriate. See our guide to cabinet hinge repair plates.
For damaged concealed-hinge mounting areas, a concealed hinge repair plate may provide a more suitable solution.
If the cabinet material is weak or the hinge screws repeatedly pull out, consider a cabinet hinge reinforcement plate instead of repeatedly reinstalling screws.
How to Drill Cabinet Hinge Holes Correctly
Step 1: Measure the Door
Measure the door thickness and determine where the hinges need to be positioned.
Do not copy measurements from another cabinet unless the doors and hinge system are actually compatible.
Step 2: Confirm the Hinge Specifications
Check the hinge manufacturer’s instructions for:
- Cup diameter
- Cup depth
- Cup-to-edge distance
- Mounting-hole pattern
- Required overlay
- Door thickness
Step 3: Mark the Hinge Position
Use a pencil and measuring tool to mark the center of the hinge cup.
For multiple hinges, make sure the hinge positions are consistent.
Step 4: Secure the Door
Clamp or otherwise secure the cabinet door so it cannot move during drilling.
Movement during drilling can produce an inaccurately positioned hole.
Step 5: Drill the Cup Hole
Use the correct boring bit and drill carefully.
Keep the drill perpendicular to the door.
Control the depth rather than drilling through the door.
Step 6: Test-Fit the Hinge
Insert the hinge cup into the hole.
Check that it sits correctly and that the hinge is not tilted.
Step 7: Drill the Screw Holes
Mark or use the hinge’s mounting holes as a guide for the screws.
Pilot holes can help reduce splitting and improve screw placement, particularly in certain wood materials.
Step 8: Install the Hinge
Secure the hinge cup using the appropriate screws.
Do not overtighten screws in MDF or particleboard.
Step 9: Install the Mounting Plate
Attach the corresponding mounting plate to the cabinet.
Make sure the plate matches the hinge system and cabinet construction.
Step 10: Adjust the Door
After installation, check the door gaps and alignment.
Small hinge adjustments can correct side-to-side, depth, and height positioning depending on the hinge design.
When the Hardware Must Be Replaced
The hinge itself may need replacement if:
- The hinge is bent.
- The hinge mechanism is broken.
- The hinge has excessive play.
- The mounting area is permanently damaged.
- The hinge no longer holds its position.
- The hinge is incompatible with the new cabinet configuration.
- The existing hinge does not provide the required opening angle.
If only the mounting holes are damaged, replacing the entire hinge may not be necessary.
For some situations, a repair plate or reinforcement solution can restore the mounting area.
If you are working with an older hinge, see how to adjust old cabinet door hinges before deciding that replacement is necessary.
Common Mistakes When Drilling Cabinet Hinge Holes
Drilling Without Measuring
Never assume the hinge position based only on visual estimation.
Using the Wrong Bit Size
A hole that is too large can leave the hinge loose, while a hole that is too small may prevent proper seating.
Drilling Too Deep
A hole that goes too deep can damage the door.
Holding the Drill at an Angle
The hinge cup needs to sit correctly in relation to the door surface.
Ignoring Overlay
Incorrect hinge placement can create major door-alignment problems.
Forgetting Door Thickness
Thin cabinet doors require particular care because there may not be enough material for the specified hinge cup depth.
Using a Damaged Door
If the hinge area is cracked or badly deteriorated, drilling another hole may not create a reliable repair.
Recommended Replacement
If you need to drill new hinge holes because you are installing replacement concealed hinges, compare the hinge specifications before buying.
For drilling tools and cabinet hinge jigs, you can browse current Amazon listings here:
Amazon — Cabinet Hinge Drilling Jigs & Tools
You can also compare concealed cabinet hinge hardware:
Amazon — Concealed Cabinet Hinges
Look for products that clearly specify:
- Compatible hinge cup diameter
- Drilling depth
- Adjustable positioning
- Door thickness compatibility
- Hinge type
- Included components
- Drill-bit compatibility
Do not choose a drilling jig simply because it is advertised as a “cabinet hinge jig.” Verify that its dimensions match your hinge system.
FAQ
Q: What size hole do I drill for a cabinet hinge?
A: Many concealed cabinet hinges use a 35 mm hinge cup, but this is not universal. Always verify the hinge manufacturer’s required cup diameter before drilling.
Q: How deep should a cabinet hinge hole be?
A: The required depth varies by hinge. Follow the hinge manufacturer’s specification and use a depth stop when appropriate to prevent drilling through the door.
Q: Can I drill cabinet hinge holes with a regular drill?
A: Yes, provided you have the correct boring bit and can maintain accurate positioning and depth. A drill press or suitable jig can make repeatable drilling easier.
Q: What is the best drill bit for cabinet hinge holes?
A: A Forstner bit is commonly used for clean, flat-bottomed concealed-hinge cup holes. The diameter must match the hinge specification.
Q: Can I fix a cabinet hinge hole drilled incorrectly?
A: Sometimes. Minor errors may be repairable by repositioning the hinge, while larger mistakes may require filling, reinforcement, or professional repair.
Q: Why is my new hinge not fitting the hole?
The hole may have the wrong diameter, depth, or position. Check the hinge specifications and your measurements before modifying the hole further.
Final Thought
Learning how to drill cabinet hinge holes is mostly about accurate measurement, controlled drilling, and matching the hole to the hinge manufacturer’s specifications. The most important rule is to measure before drilling and never assume that every concealed hinge uses identical dimensions. A clean, correctly positioned hinge hole gives the hinge a stable foundation and makes final door adjustment much easier. If the cabinet material is already damaged, however, drilling another hole may not solve the underlying problem. In that situation, consider a suitable repair or reinforcement plate instead. Take your time with the measurements, secure the door properly, control drilling depth, and test-fit the hinge before permanently tightening the hardware.